Short Rows: Knitting Holey Short Rows by Jean Clement

Pin It

Working these short rows leaves stitches unwrapped to create an unexpected design element.

No, we’re not talking about divine short rows, although it may seem as if the shaping opportunities they provide are divine. This usually brings to mind the different ways of concealing the holes that form when knitting a short row. However, there are times when you may want to leave the holes as a design feature.

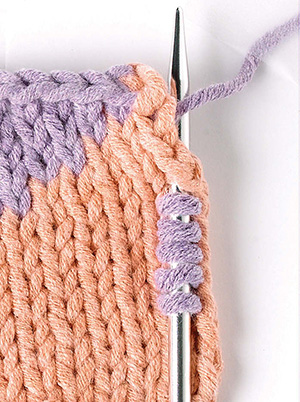
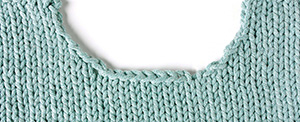
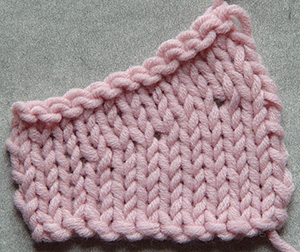
Working one short row results in an area of your knitted fabric that is two rows longer than the surrounding fabric as illustrated in Photo 1.
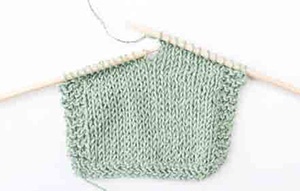
short rows photo 1

Photo 1

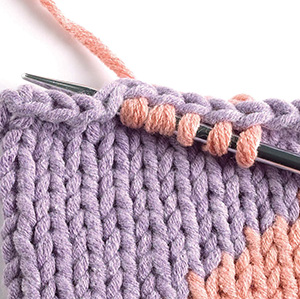
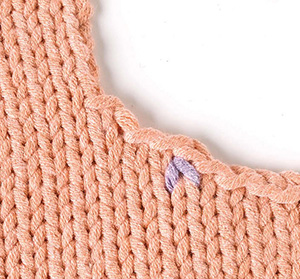
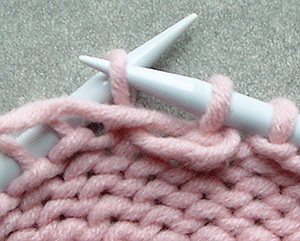
When this gap is not concealed on the next full row, you will have a hole in your knitting. And this hole looks much like an eyelet (see Photo 2).
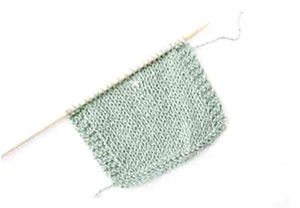
short rows photo 2

Photo 2

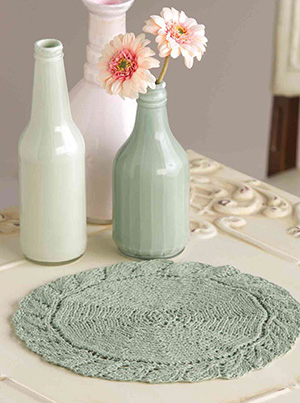
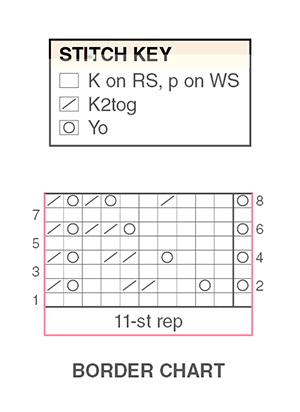
What does this mean in terms of a design element? It means that you have options when you want to combine shaping with decorative elements. For instance, the Heirloom Table Mat project uses this technique to define each wedge of the circle. Instead of concealing the holes, we use them to separate and define the circle. It ties together the stockinette stitch circle with the leaf border, mimicking the yarn-over separations between each leaf.

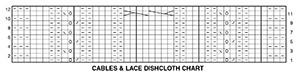
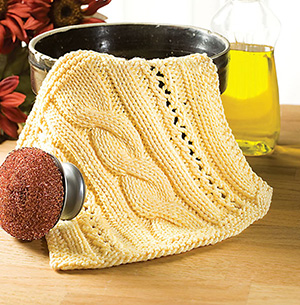
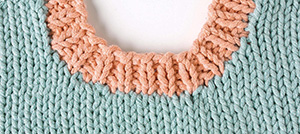
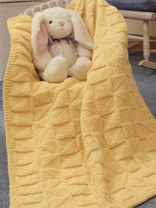
We could also use holey short rows to define the wedges of a rectangular scarf. Instead of straight rows of eyelets, we add interest and movement by working them and by not concealing the holes (see Photo 3).
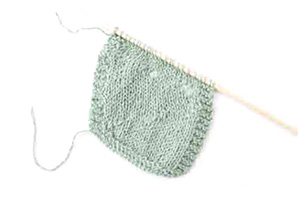
short rows photo 3

Photo 3

If you wanted to bring attention to bust darts in a sweater you could do that with holey short rows. You could also use them to work into a lace pattern.

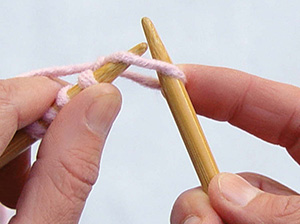
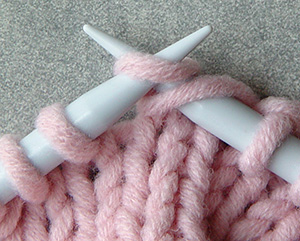
Working a holey short row is nearly the same as working a “concealed” short row. The difference is that you do not wrap the stitch at the turning point, nor do you pick up any stitches to conceal the hole when working the next complete row. The appearance of the hole created by not concealing it can be controlled by either slipping the first stitch of the return row or working the first stitch of the return row. If the first stitch is slipped, the hole will be an enlarged stitch. If it is worked, the hole will appear between stitches (see Photo 4).
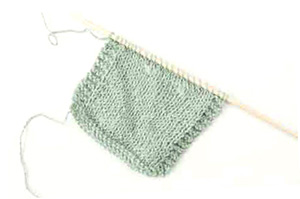
short rows photo 4

Photo 4

For the Heirloom Table Mat, the first stitch of the return row is slipped, which fits well with the yarn overs of the border pattern.

So, when you are considering using short rows to add length to an area of your knitting, consider whether you want to conceal the holes or highlight them. And now that you know about the decorative uses, don’t be afraid to swatch and experiment.

Leave a comment


Home Decor Knitting Pattern: Heirloom Table Mat, design by Jean Clement

Pin It

The Heirloom Table Mat is a home decor knitting pattern that uses hemp yarn, which only gets better with age. This natural plant fiber is known for its durability and color retention, making it an excellent choice for another home decor knitting pattern, as well.

heirloomtablemat_page_1_image_0001

Skill level: Intermediate

Finished size: Approx 10 1/2 inches across (blocked)

Materials for this home decor knitting pattern

  • Elsebeth Lavold Hempathy (DK weight; 41% cotton/ 34% hemp /25% modal; 154 yds/50g per ball): 1 ball eucalyptus #027
  • Size 6 (4mm) needles or size needed to obtain gauge

Gauge for the Heirloom Table Mat

18 sts and 36 rows = 4 inches in St st, blocked. Exact gauge is not critical to this project.

Pattern Stitch

Border (11 sts)

Notes: Border is worked at the  same time as mat. Chart is provided  for those preferring to work pat st  from chart.

Rows 1, 3, 5 and 7 (WS): Purl across.

Row 2 (RS): Yo, k1, yo, k2, [k2tog] twice, k2, yo, k2tog.

Row 4: Yo, k3, yo, k1, [k2tog] twice, k1, yo, k2tog.

Row 6: Yo, k5, yo, [k2tog] twice,  yo, k2tog.

Row 8: Yo, k3, k2tog, k2, [yo,  k2tog] twice.

Rep Rows 1–8 for pat.

Pattern Note: When blocking, the mat may be pinned or just smoothed out; it will shrink about 1/2–1 inch across if not pinned.

Table Mat Knitting Pattern

Using backward-loop cast-on  (see page 93) or long-tail cast-on (see page 94), cast on 27 sts.

Row 1 and all WS rows: Sl 1, purl  to end.

Row 2 (RS): Work Border pat  over first 11 sts, k14 (2 sts unworked), turn.

Row 4: Work Border pat over first  11 sts, k12 (4 sts unworked), turn.

Row 6: Work Border pat over first  11 sts, k10 (6 sts unworked), turn.

Row 8: Work Border pat over first 11 sts, k8, (8 sts unworked), turn.

Row 10: Work Border pat over first 11 sts, k6, (10 sts unworked), turn.

Row 12: Work Border pat over first 11 sts, k4, (12 sts unworked), turn.

Row 14: Work Border pat over first 11 sts, k2, (14 sts unworked), turn.

Row 16: Work Border pat over first 11 sts, k16 (do not close gaps).

Rep [Rows 1–16] 10 more times, then rep [Rows 1–15] once.

Join final row to cast-on row

Cut yarn, leaving a 36-inch tail.

With WS tog, graft final row to  cast-on row, working in pat toward mat center.

Note: For alternate join, bind off all sts while working final row. With RS tog, sew bound-off and cast-on edges tog.

Finishing the Heirloom Table Mat Home Decor Knitting Pattern

Weave yarn through slipped sts at mat center, pull tight to close, secure yarn.

Block mat to size.

heirloomtablemat_page_2_chartkey

1 Comment


Fair Isle Knitting: An Introduction to Stranded Colorwork Knitting, by Lisa Ellis

Pin It

“What is Fair Isle knitting?” It’s a question I’m asked often as a knitting instructor. With fancy names like “Jacquard” and “Fair Isle” and not-so-fancy names like “Stranded knitting,” it’s no wonder the question comes up all the time.

Not all stranded color knitting follows Fair Isle rules or patterns — other stranded color knitting may use more than 2 colors, carry the yarns more than 5 sts, and used different patterning than that unique to Fair Isle. Stranded is a literal name for the strands that Fair Isle knitting produces. Fair Isle is the traditional name, named after a small island off the coast of Scotland where knitters were known for their skill with the technique. There are other color knitting techniques, like intarsia and mosaic knitting; however, Fair Isle is the most common and the best technique to learn first. Fair Isle uses only 2 colors per row and alternates colors frequently to create small patterns of color — usually changing every 5 stitches or fewer. This keeps the floating strands shorter in length and more manageable.

Fair Isle is always worked in stockinette stitch and most commonly worked in rounds, which is actually easier than worked flat in rows. The yarn that is not being worked is carried along the back of the work (see Photo 1), creating floating bars or strands, hence the name Stranded knitting. Since two colors  of yarn are being carried across the row or round, the project is dense and twice as thick. This technique  is ideal for sweaters, hats and mittens; however, the knitted project has less give and elasticity for the very same reason.

Fair Isle Knitting Photo 1

Photo 1: Floats on wrong side

Reading Fair Isle Charts

All Fair Isle color patterns are charted. Charts will lay out the design and colors used. In most cases, the colors will be assigned numbers or letters, color A, B, C and so on. The chart will be condensed to show the repeat pattern. So if the chart is 10 stitches and the hat is 100 stitches, you would work the chart 10 times.

To read a chart in the round, begin in the bottom right-hand corner of the chart and go from right to left. Round 2 and every round after that will begin on the next row up and again, work from right and go left. If the project is worked flat in rows, row 2 will begin on the 2nd row of the chart and will be worked left to right. The easiest way to remember this is that the chart follows your knitting — in the round, always right to left and flat, zigzag from right to left and left to right. Rows or rounds are indicated on column sides and the stitch count is shown on the bottom row, always numbered from right to left.

Knitting in Fair Isle

Beginning with the main color used in the project, work in pattern to the new color on the chart. Then, without dropping the main color, bring the new color into position to knit into the next stitch by simply draping the yarn over the needle (see Photo 2). Continue to work the chart as instructed, dropping each yarn that is no longer needed for that next stitch and picking up the new yarn and knitting with it. Give the yarn enough slack to reach across the last used color.

Adding a new yarn color while Fair Isle knitting

Photo 2: Adding a new yarn color while Fair Isle knitting

Carrying the Yarn in Fair Isle Knitting

When Fair Isle knitting, I always like to carry the main color over the contrasting color and the contrasting color always under the main color. By doing this, the wrong side of the project will have a cleaner appearance, and it also prevents the yarns from twisting around each other and creating a tangled mess. When working flat, since the yarns zigzag back and forth, the new color needs to be twisted around the last color used on that next row to prevent a hole (see Photo 3). When working in rounds, the yarns are always worked in the same direction so this is not an issue.

Carrying over yarn while Fair Isle knitting

Photo 3: New color twisted around last color used

Preventing the Dreaded Pucker in Fair Isle Knitting

Since we are working with 2 colors and carrying the second color over as many as 5 stitches, it is easy to pull the floating strands too tight — thus creating a pucker. Puckers cannot be stretched out during blocking so be sure to be loose when carrying the new color over. By keeping the stitches on the right-hand needle spread apart instead of in a tight bunch, this will help keep the floats loose. This is one case where carrying the yarn loosely is admired!

Avoid puckers by spreading out stitches used

Avoid puckers by spreading out stitches used

When Fair Isle knitting in the round, a trick is to keep the right side of the work on the inside and the wrong side (floating bars) on the outside. This will stretch the work and keep the strands loose.

Correcting Mistakes in Fair Isle Knitting

Should you miss a stitch in the Fair Isle chart, it can easily be fixed by duplicating a stitch over the error with the correct color. It’s a flawless technique that even advanced knitters are known to use!  Once you learn Fair Isle knitting, you’ll be open to the new world that colorwork knitting has to offer.

Leave a comment


Knitting Chart: How Do I Read Cable or Lace Symbols From a Chart?

Pin It

If knitting chart reading is a mystery to you, or if you are just not sure about how to follow charts, read on. They will make your life easier!

Charts are used to provide a visual image of the design in your knitting project, which is especially helpful when the row-by-row written instructions would be very long and cumbersome to follow.

On a chart, each square represents a stitch. The knitting chart includes a stitch key to indicate what stitch the various symbols represent. For example, an empty square indicates that if you are working on the right side (RS), you knit the stitch, if you are working on the wrong side (WS), you purl the stitch. A square with a dash indicates that if you are working on the RS you purl the stitch, but if you are working on the WS you knit the stitch. Notice on the chart below that the three beginning and ending stitches alternate these symbols. This indicates that the stitch is knit both on the RS and WS of the piece.

HowDoIReadCableOrLace_Chart

HowDoIReadCableOrLace_Key

It is wise to check the stitch key and become familiar with the various symbols used on the knitting chart before beginning  the project.

The chart is read from bottom to top, and each row is numbered. For most charts the right side or odd-numbered rows are read across the chart from right to left, and wrong side or even numbered rows are read from left to right. However, before beginning, check the placement of the row numbers on  the knitting chart.

For the chart above, written instructions for the pattern are also included on the Cables & Lace Dishcloth pattern, also located on our blog. To check your chart-reading skills, try knitting from the dishcloth chart and see if the row matches our written instructions. The finished washcloth should like like the photo below:

Cables & Lace Knitted Dishcloth

Cables & Lace Knitted Dishcloth

Tips for using knitting charts

  • Enlarge a copy of the chart.
  • Use a magnetic board for the chart, moving the magnetic strip to mark your place.
  • If the pattern is repeated only once, highlight the row once it is completed.
  • For a more complicated pattern, list the rows on a separate sheet of paper and check off rows as they are worked.
  • On that same sheet make notes and keep track of the last row worked to avoid counting rows when you start your next knitting session.
Leave a comment


Knitting Charts: Where Do I Start Knitting When I follow a Chart? by Kathy Wesley

Pin It

A knitting chart provides a wonderful visual of the appearance of the finished design. The daisy pattern on the chart below is a combination of the two basic knitting stitches: the knit stitch and the purl stitch. The knit side of the daisy pattern stitch is used against the purl side or reverse stockinette stitch for an embossed look on the sweater body.

The Embossed Daisies washcloth shows how this pattern can also be reversed using the daisy pattern in reverse stockinette stitch and the background in stockinette stitch.

On the chart, each square represents a stitch and, unless otherwise noted, is worked from the bottom (Row 1) to the top. Each row of squares is numbered.

daisy knitting chart

Daisy Knitting Chart

stitch key

Charts for a flat piece usually have numbers on each side of the knitting chart. If the rows are numbered with the odd numbers on the right, Row 1 is read from right to left. If the rows are numbered with the odd numbers on the left, Row 1 is read from left to right. Check the placement of the numbers before beginning. For ease in knowing when to begin working the knitting chart, markers are used on each side of the stitches needed to work the chart.

Each chart has a stitch key included to provide the meaning of the symbols used on the chart. Take a look at Row 1 of the chart for the washcloth and see if you can write the stitch pattern for the row, then check with the answer below.

Row 1: P4, k3, p11.

How did you do? Did you remember to count the stitches from right to left and to check the key for information on whether the stitch was knit or purl. Now try Row 2. Remember it is a wrong side row and is read from left to right.

Row 2: K2, p2, k6, p5, k3.

Once you get going it’s not hard at all. Happy knitting!

Leave a comment


Cables & Lace Dishcloth Knitting Pattern, designed by Kathy Wesley

Pin It

A dishcloth knitting pattern is a good way to practice some new-to-you stitches and techniques. This dishcloth project incorporates cables and lace into its design, giving you the chance to try your hand at both.

Cables & Lace Knitted Dishcloth

Cables & Lace Knitted Dishcloth

So what are you waiting for? Grab your needles and yarn and knitting the Cables & Lace Dishcloth. Then when you’re finished, you’ll have a useful dishcloth for your kitchen. You can also make several to give to friends or to add into the next wedding or bridal shower gift you give.

Skill Level: Easy

Finished Size: 10 inches square

Materials for the Cable & Lace Dishcloth Knitting Pattern

  • Worsted weight yarn* (140 yds/100g per ball): 1 ball rich yellow #1112
  • Size 8 (5mm) needles or size needed to obtain gauge
  • Cable needle

*Sample project was completed with Fantasy Naturale (100 percent cotton) from Plymouth Yarn.

Gauge 13 sts and 20 rows = 4 inches/10cm  in St st

To save time, take time to check gauge.

Special Abbreviation C8L (Cable 8 Left): Sl next 4 sts onto cn and hold in front of work, k4, k4 from cn.

Pattern Stitch: Cable Lace Pat

row 1 (rS): K6, p2, k2tog, yo, k1, p2, k3, p2, k8, p2, k3, p2, k2tog, yo, k1, p2, k6.

row 2 and all even-numbered rows: K3, [p3, k2] 3 times, p8, [k2, p3] 3  times, k3.

row 3: K6, p2, k1, yo, ssk, p2, k3, p2, k8, p2, k3, p2, k1, yo, ssk, p2, k6.

rows 5–8: Rep Rows 1–4.

rows 9 and 10: Rep Rows 1 and 2.

row 11: K6, p2, k1, yo, ssk, p2, k3, p2, CBL, p2, k3, p2, k1, yo, ssk, p2, k6.

row 12: Rep Row 2.

Dishcloth Knitting Pattern:

Cast on 44 sts.  Knit 4 rows. Following Cable Lace chart (below) or Cable Lace Pat st, [work Rows 1–12] 3 times, then rep Rows 1–9. Knit 3 rows. Bind off.

2 Comments


Daisy Knit Washcloth Pattern Using the Embossed Technique

Pin It

This knit washcloth pattern uses the embossed knitting technique. Try it out for yourself and make a knit washcloth or a whole garden of knit washcloths featuring daisy designs. When your project is complete, you’ll see the unmistakable image of a daisy embossed in the middle of the washcloth. Just check out the photo below, and then follow the pattern instructions. Happy knitting!

Finished Embossed Daisy Knit Washcloth pattern

Finished Embossed Daisy Washcloths

Skill Level: Easy

Finished Size: 8 1/2 inches square

Materials:

  • Worsted weight yarn* (120 yards/70g per ball): 1 ball rose pink #00046
  • Size 6 (4mm) needles or size needed to obtain gauge
  • Stitch markers

Notes:

  • Sample project was completed with Sugar ‘n Cream (100 percent cotton) from Lily.
  • Gauge 18 sts and 28 rows = 4 inches/10cm in St st
  • To save time, take time to check gauge.

Knit Washcloth Pattern Instructions:

Cast on 40 sts.

Border:

  • row 1 (rS): *K1, p1; rep from * across.
  • row 2: *P1, k1; rep from * across. Rep Rows 1 and 2.

Body

  • row 1 (rS): K1, p1, k1, purl to last 3 sts, end p1, k1, p1.
  • row 2: P1, k1, p1, knit to last 3 sts, end k1, p1, k1. [Rep Rows 1 and 2] 4 times.
  • Set up pat
  • Next row: K1, p1, k1, p8, place marker, work Row 1 of chart across next 18 sts, place marker, p8, end p1, k1, p1.
  • Next row: P1, k1, p1, knit to marker, sl marker, work Row 2 of chart, sl marker, knit to last 3 sts, end k1, p1, k1.
  • Continue in established pat, working first and last 3 sts in seed st, center 18 sts following chart (page 64) and  rem sts in rev St st until Row 26 of chart is completed.  [Rep Rows 1 and 2] 5 times.

Border: Work 4 rows in seed st. Bind off all sts.

Design by Kathy Wesley

1 Comment


The Pick-Up Game: How to Pick up Stitches in Knitting by Kathleen Power Johnson

Pin It

There is little more frustrating and confusing to the novice knitter than the notion of picking up stitches. Even more experienced knitters confess to feeling less confident about picking up stitches than other finishing skills.

What do you pick up? And where? And why? And then what do you do with it?

Picking up stitches means to create a new stitch along a knitted edge. This can be a horizontal edge, like the top of a pocket or the bottom of a sleeve; it can be a vertical edge like a cardigan front; or it can even be a combination of both, like a neckline that has both horizontal and vertical elements.

Nuts & Bolts

The general technique for picking up stitches is the same for all cases: insert your tool under both threads of a stitch, wrap the yarn around and pull through a loop. Voilá! a new stitch.

I used the word “tool” because, while most people use a single knitting needle for this operation, some knitters prefer to use a crochet hook. The results are the same, but the crochet hookers have the extra step of transferring each new stitch to their knitting needle. (There are some double-duty tools available with a hook on one end and a needle on the other if you want to be stubborn about this.)

Then there’s the matter of where the tool goes: under both threads of the stitch with few exceptions. (Photos A and B)

Photo A

Photo A

Photo B

Photo B

This is an important rule. By working under both threads, you have a stable base for whatever you’re attaching to your project. Working under a single thread might be easier but it enlarges the stitch and, more often than not, produces a sloppy, unhappy result.

You usually use a needle a few sizes smaller for edgings worked from picked up stitches. If you have trouble getting that needle into the base stitch correctly, use a smaller needle, but tie a bit of yarn around your finger to remind yourself to switch to the correct size.

So here you are: you’ve poked the needle (or hook) under a full stitch, the yarn goes round the needle and out comes a new stitch. Kind of sounds like plain old knitting, right? That’s why this technique for picking up stitches is often called “knitting up stitches.”

If you can knit up stitches, then you can purl them up too, although that’s not done very often. Consider permission granted to do this when necessary, though. Knit up stitches with the right side of your knitting facing you and purl up with the wrong side facing.

Picking Up Stitches in Those Challenging Necklines

You’re told to pick up stitches most often when it comes to finishing necklines. How many stitches do you pick up? Sometimes the designer will tell you exactly the number to pick up in each segment of the neckline. Lucky you!

Or, she may just give you a flat number of stitches for the whole neckline. Or you may be on your own.

The rule of thumb is: Where the neckline is horizontal (i.e., bound-off stitches), pick up one stitch per stitch. Where the neckline is vertical or sloped (i.e., the ends of rows) pick up between two out of every three (heavy yarns) OR three out of every four stitches (lighter-weight yarns). For garter stitch, sometimes one out of every two works just fine. You’ll thank me for this advice: settle on your pick-up ratio (and needle size) by experimenting on your gauge swatch first.

Use this rule of thumb as you pick up stitches, getting as close to the number given, if one is given, as you can. You can always make minor adjustments on the next row/round.

Appearance is Everything When Picking Up Stitches

As you work along a neckline edge, you’ll encounter a few potholes or gaps produced by the transition from bind off or decreases to the next row, and speed bumps created by decreases. (Photo C)

Photo C

Photo C

Avoid picking up stitches in the gaps if you can, since this only emphasizes them. With decreases, try moving down to the stitch below the decrease.

Don’t Forget Vertical Bands

Use the same pick-up ratio for picking up stitches for cardigan bands. For these bands, as well as neckline finishes, it can be an extra help to divide each edge into evenly spaced segments. This makes it easier to guarantee a balanced distribution of picked-up stitches.

Pick-Up Tips

Use a stockinette selvage stitch wherever you plan to pick up stitches to have the maximum choice for placement.

If your skipped stitches make the edge look uneven, pick up as many as you need to make this step look good. Decrease evenly as needed on the first row or round. When you’re using a different yarn than the main body, you may find that you need more stitches than there are picking-up opportunities.

Pick up what you can and increase (invisibly) on the next round. You can also try picking up some extra stitches into the front or back thread of a few stitches.

When the ribbing is a different color than the edge into which you’re working, pick up stitches in the main color before switching to the ribbing/edging color.

Sometimes it’s hard to avoid having a gap. Use a duplicate stitch to tidy things up. (Photo D)

Photo D

Photo D

Once completed, the edging creates a clean, neat and finished look for the garment.  (Photo E)

Photo E

Photo E

Leave a comment


Cast On Options — Knitted-On & Picots By Beth Whiteside

Pin It

Cast on to create the foundation stitches of knitting. Most knitters start each project the same way they were taught when they learned to knit. But there is a whole world of other options out there to explore. Becoming familiar with them and their characteristics enables the knitter to make appropriate choices when a pattern itself gives little or no guidance.

The Knitted Cast-On

Let’s start with the knitted-on cast on. It is very basic, is worked with two needles and is almost the same as knitting. Unlike some others, it allows you to easily add stitches onto a row of existing stitches. Begin by putting a slip knot on your left-hand needle. Insert the right needle into the slip knot as if to knit, wrapping the working yarn around the right needle as when knitting and pulling through a new loop, but don’t take the old one off the left needle. Instead, move the left needle below (to the right of) the new loop on the right needle; now put the new loop back on the left needle (see Photos 1 and 2). Putting the new loop back on the left needle in this fashion will make a nice edge. Continue in this fashion, working into the last loop made, until you have the desired number of stitches on your lefthand needle.

Photo 1

Photo 1

Photo 2

Photo 2

Picot the Night Away

To add a pretty picot edge to your work, cast on extra stitches and then immediately bind them off. For example, cast on three stitches, bind off one stitch, put the single stitch now on the righthand needle back on the left-hand needle and repeat. The bound-off stitches create the decorative bumps, or picots, along the edge of the work. The size of the picots can be varied by changing the number of stitches that are cast on and bound off. The number of stitches between picots can also be varied for different effects.

To work the another type of picot edge, begin by making a slip knot and using the knitted-on cast-on to add three stitches. Bind off one stitch as usual by knitting two and pulling the first stitch over the second. Place the single stitch on the right-hand needle back on the left needle as when working the knitted-on cast-on, by taking the left needle below (to the right of) the stitch to transfer it. From this stitch, cast on three stitches using the knitted-on cast-on, bind off one, put one back, repeat. For every three stitches, one is bound off into a picot; picot stitches are separated by one plain cast-on stitch.

If you hadn’t used them before, now you have two more cast-ons in your knitting toolbox, one utilitarian and one decorative. The knitted-on cast-on can add back stitches that were bound off for buttonholes, and the picot cast on adds a cute edging to socks or baby clothes. Grab some yarn and start stitching!

2 Comments


Get the Lowdown on Knitting Short Rows by Beth Whiteside

Pin It

Short rows let us knit sock heels that fit our heels, work shoulders without the ugly stepped bind offs, or put darts right where we need them. What exactly is a short row? Not a row with less height than its brethren; in point of fact, short rows add height. The “short” of it is in the number  of stitches worked, in width. Short rows are partially knitted rows, rows turned  and worked back before the final stitch  is reached.

Basic method for knitting short rows

How do short rows work? Let’s look at a simple example, three pairs of short rows worked in three-stitch steps on 12 stitches.

Row 1: Knit 9 stitches, leave the remaining 3 on the left-hand needle; turn the work around as you would at the end of a row.

Rows 2, 4, 6: Slip the first stitch on what is now your left-hand knitting needle as if to purl; purl back across the stitches you just knit.

Row 3: Knit 6 stitches, turn the work.

Row 5: Knit 3 stitches, turn the work.

The six rows just worked have raised the right side of the work (Photo A), forming a diagonal, yet leaving all 12 stitches on the needle. All stitches remain “live” on your needles, and can be reactivated simply by knitting across. In Photo A the live stitches were reactivated, then bound off, much  as you might for the sloped shoulder line on a sweater.

Photo A

Photo A

A better way: Wrap ’em up

The basic method of knitting short rows leaves small holes in the fabric. These holes might not be noticeable in some stitch patterns, or could be incorporated into a design as decorative elements. But for most projects we’d like to hide them, and luckily another method exists.

In the “wrap and turn” method the working yarn is “wrapped” around the first stitch on the left needle before turning the work for the return row. This step helps close the gap created at the turning point by pulling the two stitches together. The wrap is worked together with the stitch  it surrounds the next time the entire row is knit.

To try it out, work as for the basic method described above to the first turning point. Slip the first stitch on the left needle purlwise to the right needle; bring the working yarn from the back to the front between the needles. Put the slipped stitch back on the left needle. Now turn the work around. Bring the working yarn to the front between the needles and slip the first stitch on the new left needle purlwise (see Photo B). Purl across the rest of the wrong-side row.

Photo B

Photo B

When you are ready to reactivate all stitches, work across to the first wrapped stitch. The wrap and the stitch can be knit together in either of two ways, producing the same end result. Insert the right knitting needle tip under the wrap itself first, then into the stitch on the needle, and wrap the working yarn around the back needle as usual and pull it through both the stitch and the wrap, then slide the new stitch off to the right needle (see Photo C). Or you might find it more comfortable to slip the wrapped stitch purlwise to the right needle, insert the left needle under the wrap, then place the slipped stitch back on the left needle; knit the wrap and the loop together.

Photo C

Photo C

Working in stockinette stitch and reverse stockinette stitch emphasizes the shape of the stacked triangles. Once you get the basics, you’re ready for sock heels, shoulder shapings and knit hedgehogs!

2 Comments