

There is little more frustrating and confusing to the novice knitter than the notion of picking up stitches. Even more experienced knitters confess to feeling less confident about picking up stitches than other finishing skills.
What do you pick up? And where? And why? And then what do you do with it?
Picking up stitches means to create a new stitch along a knitted edge. This can be a horizontal edge, like the top of a pocket or the bottom of a sleeve; it can be a vertical edge like a cardigan front; or it can even be a combination of both, like a neckline that has both horizontal and vertical elements.
Nuts & Bolts
The general technique for picking up stitches is the same for all cases: insert your tool under both threads of a stitch, wrap the yarn around and pull through a loop. Voilá! a new stitch.
I used the word “tool” because, while most people use a single knitting needle for this operation, some knitters prefer to use a crochet hook. The results are the same, but the crochet hookers have the extra step of transferring each new stitch to their knitting needle. (There are some double-duty tools available with a hook on one end and a needle on the other if you want to be stubborn about this.)
Then there’s the matter of where the tool goes: under both threads of the stitch with few exceptions. (Photos A and B)
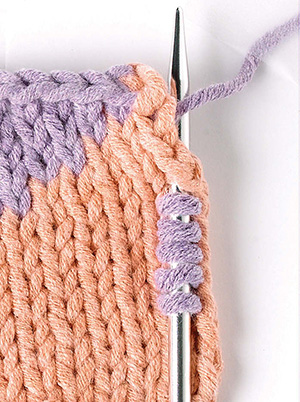
Photo A
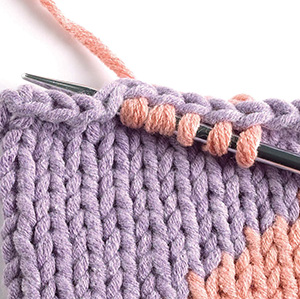
Photo B
This is an important rule. By working under both threads, you have a stable base for whatever you’re attaching to your project. Working under a single thread might be easier but it enlarges the stitch and, more often than not, produces a sloppy, unhappy result.
You usually use a needle a few sizes smaller for edgings worked from picked up stitches. If you have trouble getting that needle into the base stitch correctly, use a smaller needle, but tie a bit of yarn around your finger to remind yourself to switch to the correct size.
So here you are: you’ve poked the needle (or hook) under a full stitch, the yarn goes round the needle and out comes a new stitch. Kind of sounds like plain old knitting, right? That’s why this technique for picking up stitches is often called “knitting up stitches.”
If you can knit up stitches, then you can purl them up too, although that’s not done very often. Consider permission granted to do this when necessary, though. Knit up stitches with the right side of your knitting facing you and purl up with the wrong side facing.
Picking Up Stitches in Those Challenging Necklines
You’re told to pick up stitches most often when it comes to finishing necklines. How many stitches do you pick up? Sometimes the designer will tell you exactly the number to pick up in each segment of the neckline. Lucky you!
Or, she may just give you a flat number of stitches for the whole neckline. Or you may be on your own.
The rule of thumb is: Where the neckline is horizontal (i.e., bound-off stitches), pick up one stitch per stitch. Where the neckline is vertical or sloped (i.e., the ends of rows) pick up between two out of every three (heavy yarns) OR three out of every four stitches (lighter-weight yarns). For garter stitch, sometimes one out of every two works just fine. You’ll thank me for this advice: settle on your pick-up ratio (and needle size) by experimenting on your gauge swatch first.
Use this rule of thumb as you pick up stitches, getting as close to the number given, if one is given, as you can. You can always make minor adjustments on the next row/round.
Appearance is Everything When Picking Up Stitches
As you work along a neckline edge, you’ll encounter a few potholes or gaps produced by the transition from bind off or decreases to the next row, and speed bumps created by decreases. (Photo C)
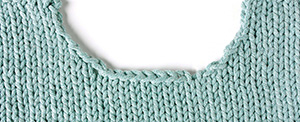
Photo C
Avoid picking up stitches in the gaps if you can, since this only emphasizes them. With decreases, try moving down to the stitch below the decrease.
Don’t Forget Vertical Bands
Use the same pick-up ratio for picking up stitches for cardigan bands. For these bands, as well as neckline finishes, it can be an extra help to divide each edge into evenly spaced segments. This makes it easier to guarantee a balanced distribution of picked-up stitches.
Pick-Up Tips
Use a stockinette selvage stitch wherever you plan to pick up stitches to have the maximum choice for placement.
If your skipped stitches make the edge look uneven, pick up as many as you need to make this step look good. Decrease evenly as needed on the first row or round. When you’re using a different yarn than the main body, you may find that you need more stitches than there are picking-up opportunities.
Pick up what you can and increase (invisibly) on the next round. You can also try picking up some extra stitches into the front or back thread of a few stitches.
When the ribbing is a different color than the edge into which you’re working, pick up stitches in the main color before switching to the ribbing/edging color.
Sometimes it’s hard to avoid having a gap. Use a duplicate stitch to tidy things up. (Photo D)
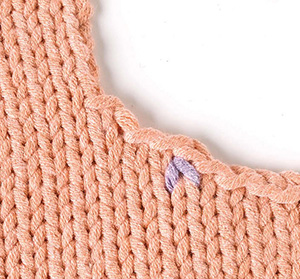
Photo D
Once completed, the edging creates a clean, neat and finished look for the garment. (Photo E)
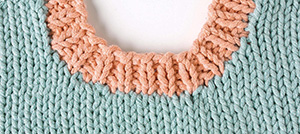
Photo E
