

Short rows let us knit sock heels that fit our heels, work shoulders without the ugly stepped bind offs, or put darts right where we need them. What exactly is a short row? Not a row with less height than its brethren; in point of fact, short rows add height. The “short” of it is in the number of stitches worked, in width. Short rows are partially knitted rows, rows turned and worked back before the final stitch is reached.
Basic method for knitting short rows
How do short rows work? Let’s look at a simple example, three pairs of short rows worked in three-stitch steps on 12 stitches.
Row 1: Knit 9 stitches, leave the remaining 3 on the left-hand needle; turn the work around as you would at the end of a row.
Rows 2, 4, 6: Slip the first stitch on what is now your left-hand knitting needle as if to purl; purl back across the stitches you just knit.
Row 3: Knit 6 stitches, turn the work.
Row 5: Knit 3 stitches, turn the work.
The six rows just worked have raised the right side of the work (Photo A), forming a diagonal, yet leaving all 12 stitches on the needle. All stitches remain “live” on your needles, and can be reactivated simply by knitting across. In Photo A the live stitches were reactivated, then bound off, much as you might for the sloped shoulder line on a sweater.
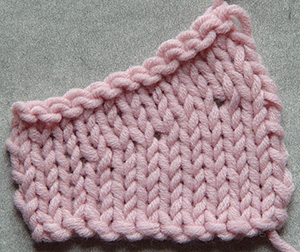
Photo A
A better way: Wrap ’em up
The basic method of knitting short rows leaves small holes in the fabric. These holes might not be noticeable in some stitch patterns, or could be incorporated into a design as decorative elements. But for most projects we’d like to hide them, and luckily another method exists.
In the “wrap and turn” method the working yarn is “wrapped” around the first stitch on the left needle before turning the work for the return row. This step helps close the gap created at the turning point by pulling the two stitches together. The wrap is worked together with the stitch it surrounds the next time the entire row is knit.
To try it out, work as for the basic method described above to the first turning point. Slip the first stitch on the left needle purlwise to the right needle; bring the working yarn from the back to the front between the needles. Put the slipped stitch back on the left needle. Now turn the work around. Bring the working yarn to the front between the needles and slip the first stitch on the new left needle purlwise (see Photo B). Purl across the rest of the wrong-side row.
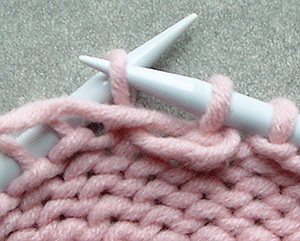
Photo B
When you are ready to reactivate all stitches, work across to the first wrapped stitch. The wrap and the stitch can be knit together in either of two ways, producing the same end result. Insert the right knitting needle tip under the wrap itself first, then into the stitch on the needle, and wrap the working yarn around the back needle as usual and pull it through both the stitch and the wrap, then slide the new stitch off to the right needle (see Photo C). Or you might find it more comfortable to slip the wrapped stitch purlwise to the right needle, insert the left needle under the wrap, then place the slipped stitch back on the left needle; knit the wrap and the loop together.
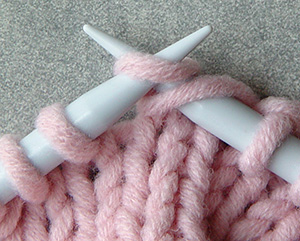
Photo C
Working in stockinette stitch and reverse stockinette stitch emphasizes the shape of the stacked triangles. Once you get the basics, you’re ready for sock heels, shoulder shapings and knit hedgehogs!

2 Responses to Get the Lowdown on Knitting Short Rows by Beth Whiteside