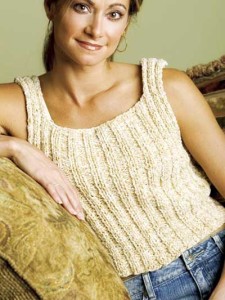
Side-to-Side knit items can be made and assembled in any number of ways; worked in pieces from the bottom up is the most traditional method. Other forms have gained popularity over the years, such as circular, from the top down, or side to side. This article will explore types of side-to-side construction, looking at advantages as well as disadvantages, stitch-pattern considerations and shaping methods.
Side-to-Side Knits| Considerations
When finished, an advantage to side-to-side knits is that the garment will lay flat. Often no further finishing is needed. Also, it’s a great way to try different stitches within a design, such as panels of texture in rich vertical stripes. Stripes are an obvious choice. They are often chosen for side-to-side knits because of flattering vertical lines that naturally occur. Color-pooling is also kept to a minimum when knitting vertically. With vertical knits, the most important thing to remember is that the width of a garment will determine the number of rows. Stitches will not determine the width. Stitches determine the length. Measure gauge swatches carefully to allow for the stretch factor, which results when stitches are turned on the side. Make swatches large enough to hang vertically (at least 6 inches, but 8 inches is preferred). When designing, it may be necessary to calculate two gauges within a garment, especially sleeveless knits. The weight of a garment may cause more stretch in the armhole section than within the body of a piece. This is particularly true in some stitch patterns, such as garter stitch, or various yarns, such as nylon or cotton. These have a tendency to stretch anyway. If you measure a swatch while it’s hanging, this can compensate for these changes.
Sleeve or Sleeveless
Vests and tanks are quick to knit. They only require a little seaming on the side and can even be grafted together for beautiful seamless joins. Pullovers and cardigans can be constructed cuff to cuff or by knitting the body in one piece, adding sleeves later. Simple fabrics such as garter, stockinette or seed stitch will look the same on both sleeves. If you choose patterns such as Fair Isle or lace, you may find the design will be different when you knit up than when you knit down. However, there are ways to compensate for this difference. Stitches for the sleeves can be picked up from the body and knit down, or they may be knit separately and joined to the body in a more traditional way. Another option is to knit two pieces from the body center out to each cuff and graft them together to assemble. Additionally, you may start with the body and knit to one cuff, and then pick up stitches and knit to the other cuff.
Shaping
An added plus in side-to-side knits comes into play with shaping. Neckline and shoulder shaping can be achieved in a smooth transition. You can increase on one side and decrease on the other, eliminating stair-step and bound-off stitches. Short-row shaping creates beautiful V-necks and A-lines, achieving a sculptured, contoured fit.
Finishing & Seaming
Finishing can be minimal with side-to-side garments. Trims, however, may be added as with all knits. You can use waste yarn to start and end edges (such as for buttonbands and cuffs), which makes it easy to pick up and finish off from live stitches. Use a smooth, contrasting color of cotton yarn for the waste yarn. It will be easier to see and remove later. Knitting vertically can be an exciting experience, opening up new design options. It lends itself well to creativity and versatility in designs.
By KENNITA TULLY


